12 – Final Finishing, and Marking
So – that’s it, isn’t it? The flute is tuned TO PERFECTION, and will play beautifully… sadly only for about a week. Now we need to “Finish” the flute to prevent environmental conditions getting into it and wrecking our carefully crafted wood’s shape and size. This has the interesting and fortunate side-effect of making our flute even more beautiful to look at! I have a principle, a policy if you will – I ONLY use 100% natural finishes. The ones I have used so far are tung oil, walnut oil, teak oil, shellac (French Polishing), beeswax, and beeswax mixed with carnuba wax. Whatever your chosen finish, it needs to be applied with care and skill; a poorly applied finish looks far worse than no finish at all! I’ll include some basic tips here; but a full coverage of finishing wood is actually another book all on its own!
- Tung Oil: This oil plasticises when it dries; it’s more like a varnish. However, applied in too thick a coating, or in cold conditions, it can leave an oily residue on the wood which is very hard to get rid of. Applied well and allowed to dry enough, it looks really good.
- Teak Oil: This oil soaks into the wood and doesn’t darken it much; a few coats will look lovely and shiny. It smells great too!
- Walnut Oil: Like teak oil but darkens the wood a bit more; and it’s cheaper because it’s sold as a food oil in supermarkets! As many coats as you like here; more is better. It looks and feels really beautiful on darker woods. (in my opinion).
- Shellac: Extremely hardwearing, gives a deep glossy sheen and lasts a very long time. Needs no maintenance bar a wipe now and then.
- Beeswax: Gives a beautiful shine after a few coats; applied thinly when hot and then polished with a soft cloth. Needs regular polishing by the owner to keep it looking nice.

- Beeswax mixed with Carnuba Wax: A little more hardwearing than beeswax alone, this looks just as nice but doesn’t need as much in the way of owner polishing. I use 25% Carnuba and 75% Beeswax.
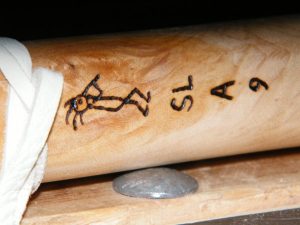
Before you apply your finish, you may wish to apply your “Maker’s Mark”; or mark it with its key; or otherwise decorate it. Of course there are many many ways to make marks on wood – but I favour hot-wire pyrography to make my marks – you can buy a kit very cheaply online and with a bit of practice you can make very good stuff with it. The photo shows my maker’s mark (an image of Kokopelli and the letters “SL”) and the key of the flute – it’s on the back of the flute not far below the block ties. My first 20 flutes were also marked with a serial number.
The last thing I would do on my premium flutes would be to add feathers and beads to the ends of the bird ties; maybe to make a leather wrap for the lower end of the flute; or possibly use a beading loom to make a decorative bead wrap.
Thank you Stonelaughter, I’ve enjoyed going on this journey with you. It’s been wonderful to watch the flute come together and see all the different steps that go into making it. I didn’t realise how much work was involved!
Dude it’s an incredible journey on every single flute… I absolutely love this work.