9 – Initial Tuning
Tuning
This is where we get more “mathy”. (Mathsy for us Brits 😉 ). There are a number of ways to work out where the holes go on a flute, and that’s just for “Minor Pentatonic”. There’s the “Flutomat” at Flutopedia; there’s an Excel Spreadsheet by Bob Grealish, also on Flutopedia; and there’s a nice “rule of Thumb” method. In the end, whatever method you use, initial hole placement and subsequent sizing is going to be an approximation because you cannot describe the exact shape and size of all the critical parts of your flute with enough accuracy to satisfy the maths and make the answers absolute.
To use either of the calculators above, you’ll need to make measurements – I prefer Bob’s spreadsheet which is far simpler and also has detailed instructions. To use it, you’ll need to measure the following:
1. Length from the North edge of the TSH to the bottom of the flute.
2. The average (mean) thickness of the walls, at the base of the flute.
3. The wall thickness at the front centre of the base can be taken as the wall thickness “at the playing hole”.
4. The inside width and height of the bore.
Open the spreadsheet, and on the “Hole Size Calc” sheet, fill in all the blue squares with your measurements, and on line 6, use the dropdown on the blue cell to select the key for your flute – in our case “G above Middle C”. Change the number in the cyan coloured cell until the number to its right in the orange square is as close to zero as you can get. The value in the cyan square should be between 0.25″ and 0.35″, and you can use three or four decimal places if you want to. This will tell you the optimal size for the second hole up the flute; which is a useful guide for the size of the other holes.
Now fill in the same blue cells on the “Mode 1&4 Pent” sheet; and also the “thickness at hole” blue cells below; and put the size from the previous sheet into all the cyan cells. This will give positions for the holes as distances from the south end; hole 1 at the bottom and hole 6 at the top.
Mark the holes by drawing a fine line (gently) down the centre of the front of the flute – then measure as per the spreadsheet and make a clear mark at each position. Put your fingers on the marks, and ensure you can easily reach all the positions. If you’re having trouble with any of the holes, you can adjust the sizes of them (in the spreadsheet cyan cells) to move them up and down the flute; when you have positions your fingers can easily reach and sizes between 0.25″ and 0.35″, these will be your final marks. Please note: Bob gives extremely detailed instructions for top quality tuning on the first two sheets of the spreadsheet; however this ignores what you can reach and whoever buys the flute will be at the mercy of the holes – this is OK in most circumstances but may inconvenience some players).
Now, drill a 5mm hole at each position, use extremely sharp, spiked drill bits designed for wood; and use minimal pressure to minimise the splintering on the inside and to save popping through the back wall of the flute. Best of all here is to use a hand-cranked brace to drill; but an electric will do if this is not available. When this is done, use every means at your disposal (sandpaper on the end of a long dowel, dentist’s pick tools, whatever you have to hand) to remove swarf and splinters from the inside of the flute. These DESTROY sound. A lot of effort here will be paid back in spades.
For the purposes of this post, the temperature of the room needs to be 18°C (65°F) for the next part. If it isn’t, you’ll need to make adjustments to your tuner to cope with it – I’ll cover this another time.
Now – fire up your tuner, cover all the holes and check the note played; it should have come up a little and be closer to the “G” we chose; if not, cut 1mm off the end and sand the splinters off; check again. Repeat to bring it close to “G”, but not quite perfect just yet. Now use your tuning iron (just starting to go red at the tip) or your first truncated reamer to make the first hole a little bigger. Cool the hole down by blowing on it; and then play the note with the first hole uncovered… repeat this until the note is the same distance from “perfect” as G was. Then do the same for the other holes, one by one. Tune the 4th hole while covering holes 6, 5 and 3. At all other times, hole 4 should remain covered. The chart on this link shows which notes should play for which key of flute for each fingering.
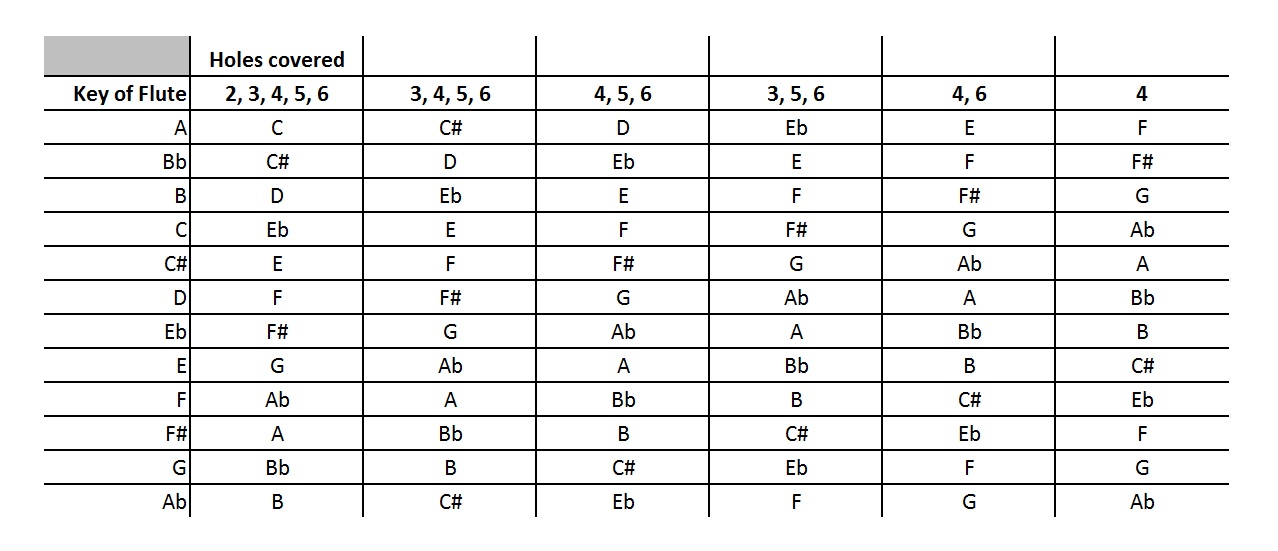