So – how does it all work?
So you’ve got this flute, and you know how to make pretty noises with it… but you don’t know HOW it does it! Well, I’m here to help you find out. We’re going to go quite detailed; but not deeply technical or into the physics.
First thing to appreciate is that air is a substance like water, concrete, wood. It has mass and weight and it resists being pushed around. (Stick your hand out the car window on the motorway – the air pushes HARD on your hand, right? Well, it does the same to other air too. If you blow out smoke, it doesn’t just keep going; it slows down and widens into a cloud… eventually it stops moving forwards altogether. That’s the still air in the room doing that.
Air in a flute is no different and you’ll see why.
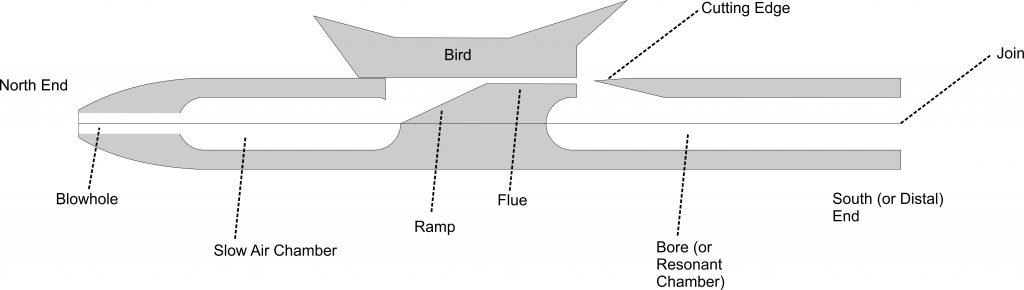
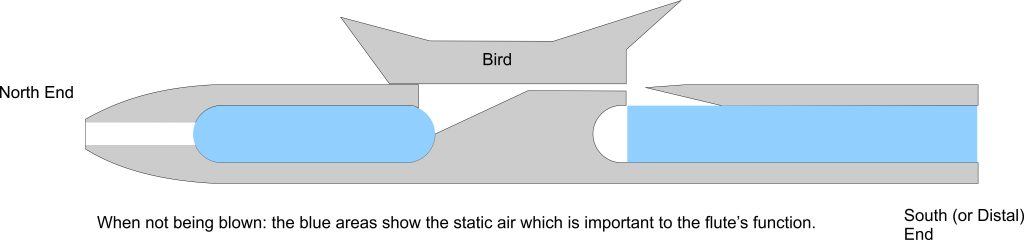
Have a look at this cutaway diagram of a flute which is not being blown into – it’s just sitting. All the open spaces in it are full of air at the same pressure as outside the flute.
At the North end, you can see the blowhole and the Slow Air Chamber. Then there’s a ramp, the flue, an exit slot into the True Sound Hole (TSH), and then a cutting edge. Below and to the “South”, there’s the bore.
OK now when we first blow into it, a whole lot of stuff happens very quickly. First of all, the air in the Slow Air Chamber (SAC) increases in pressure significantly; its exit route is restricted by the bird (block), ramp and flue.
Then some of the high pressure air in the SAC starts to flow up the ramp which constricts it even further. The Gas Laws (which we don’t need to cover here) mean that as it goes up the ramp, the gas decreases in pressure, increases its speed, and increases in temperature; until it reaches the flue. It flows along the flue in a near-laminar flow; same speed, temperature and pressure at all depths of the flue. (This is why the flue and the base of the block need to be smooth and flat; turbulent or uneven flow makes for a hissy, less flutey sound).
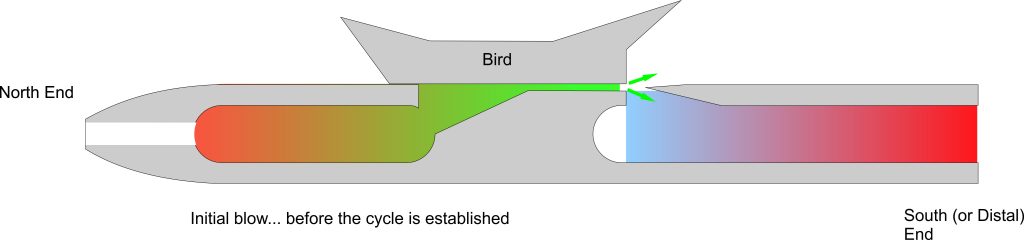
As the air exits the exit slot to the TSH, it encounters the splitting edge. As it happens, the flow is STILL LAMINAR at this point, assuming the TSH is of a good design and accurate shape and size. So – because it’s laminar, a proportional amount of air is sent outside the flute where it simply escapes; and into the flute body. (Note: The proportion of each will depend on the vertical position of the splitting edge; mine are as central as possible which means that the flow splits close to 50/50).
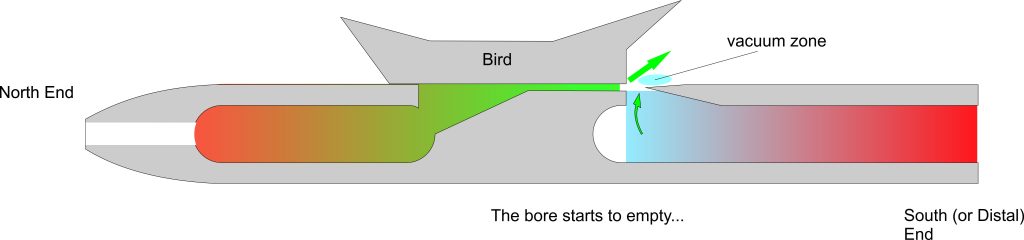
The air entering the flute body eagerly flows down the bore until it gets to the end; when it gets to the end however, it encounters a static wall of air at the end of the flute… and this acts as a barrier like your hand in the car airflow. The air inside the flute body cannot exit against this soft barrier as quick as it’s moving down the flute and therefore its pressure starts to build at the foot of the flute and this pressure increase starts to work its way back up the flute toward the top.
As the bore “fills up” in this way, it eventually reaches the top of the bore and the TSH.
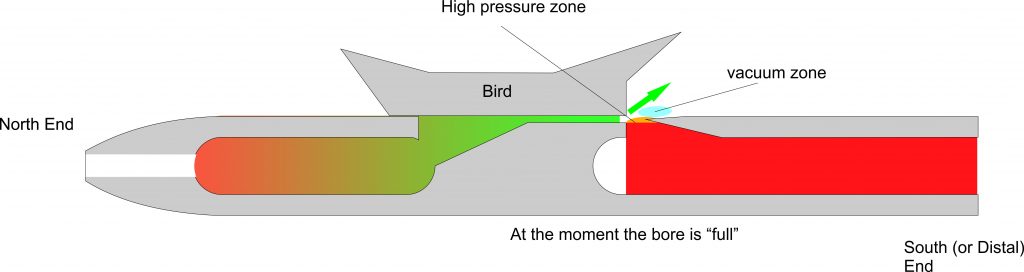
This has two major effects. Firstly, the splitting edge cannot force any more air down into the bore, so most of it exits the flute. Secondly, this acts like an aircraft wing and a low pressure area forms just South of the splitting edge. Some of the air is still escaping at the foot of the flute; and so SOME of the laminar air replenishes it; however at this precise moment, most of it is leaving the system and creating this “vacuum” or low pressure zone, at the TSH.
“Nature abhors a vacuum” as they say and it’s true. Air will start to flow out of the bore via the TSH to fill this vacuum. Once this motion is established, ALL the laminar air from the flue goes outside the flute and escapes. Also, the flow out of the bore has inertia; it keeps moving until a vacuum is formed INSIDE THE BORE.
Once the vacuum forms inside the bore, at some point it reaches equilibrium with the vacuum outside the bore; this uses up any remaining inertia in the upward flow of air and then no more air can be extracted; in fact the vacuum created starts to draw air back inside the bore.
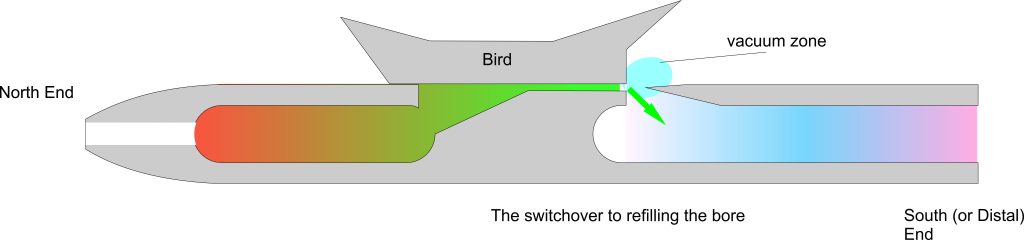
At this point, the flow switches from “all outwards” to “all inwards”, and the cycle begins again.
Now because this is the movement of a “pressure wave” from the base of the flute to the top and back again, it moves at the speed of sound. At 20°C with a flute of exactly a certain length, a complete fill, empty, fill cycle will take 1/440th of a second; meaning it occurs 440 times per second, or “Hertz”. This just happens to be the frequency which the fourth “A” key from the left of a piano creates; or “A4”.
The finger holes on a flute simply move the perceived exit point from the base of the flute Northward; the wall of air at the “foot” is encountered earlier, and less of the bore fills up. This means that filling, and emptying, the bore is quicker; which means that it occurs more often per second – giving a higher pitched note.
There is some incredibly complex physics behind all this, (for instance “nodal interference” when finger holes are in certain spots) making certain dimensions of parts of the flute absolutely critical in getting the sound you want…
The main ones to get right are the width and depth of the flue; the width and length of the true sound hole; the sharpness of the cutting edge; the correct angle of the cutting edge which should be exactly orthogonal to the airflow; the vertical position of the cutting edge; the steepness of the ramp underneath the cutting edge.
Other factors having significant effects on sound production are the smoothness of the flue’s lower surface and that of the block/bird; the sharpness of the cliff-edge (which should be slightly rounded evenly across its width but not too much); and the smoothness of the inside of the bore (the smoother, the better the motion of the pressure wave up and down the bore).
You should note that if your flute makes a sound, you’re doing a great job; it’s not easy. But getting the sound YOU WANT means subtly adjusting all these measures until it sounds “right” to you; once it makes any kind of sound at all, there are no right or wrong answers; except that it has to make the sound you want.
Excellent explanation mate thanks for taking the time!!